If you are experiencing display issues while playing games on your PC, and none of the graphics settings are making a difference, it might be due to the refresh rate of your display. A refresh rate — measured in hertz (Hz) — is the number of times a display screen refreshes with a new frame or information per second when using a PC or laptop. A higher refresh rate means a smooth transition of motion and less screen flickering, which is essential when performing fast-paced tasks on your computer, such as PC gaming or graphic design.
Generally, Windows sets the refresh rate of your monitor or laptop’s display to 60Hz by default, as that is sufficient for daily computing tasks like web browsing, office work, and light gaming. Then there is 120Hz, which is ideal for 4K monitors because it is smoother and more responsive than 60Hz. Other than that, 144Hz and 240Hz refresh rates are also popular among professional gamers and graphic designers as they need the highest level of response time. These refresh rates are typically only available on high-end external monitors.
Display issues on your Windows PC, like screen flickering while gaming or performing graphical tasks, can be frustrating. To tackle this, Windows 10 and 11 have settings to change the refresh rate where applicable. However, this is only possible if your laptop’s internal display or monitor supports multiple refresh rates.
How to change the refresh rate on Windows 10 or Windows 11
Changing the refresh rate on Windows 10 or Windows 11 is a simple, straightforward process. Here are the steps to change your display’s refresh rate:
- Right-click on an empty space on the desktop and select Display Settings from the Context Menu.
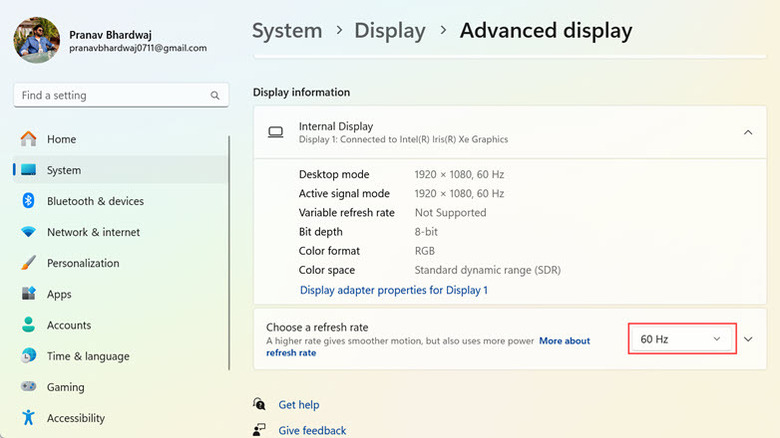
- Scroll down and look for the Advanced Display settings option under Related Settings.
- Under the Advanced Display settings, expand the drop-down menu and select the display for which you want to change the refresh rate.
- Under the selected Display, look for the Choose A Refresh Rate option below the Display Information heading.
- Expand the drop-down menu next to it, and select the appropriate refresh rate that you’d like to apply.
- Close the settings window and check if the new refresh rate isn’t causing any display issues.
By following the above steps, you can experiment with different refresh rates and choose the one that best suits your display or your work requirements. If you are using Windows 11, you can also enable the Dynamic Refresh Rate (DRR) option. It will automatically adjust the refresh rate based on your activity, again, if your display supports it.
Benefits and drawbacks of changing your display’s refresh rate

There are a few reasons why changing the refresh rate might benefit you. If you are facing display issues on your Windows device, whether the PC display looks laggy or is hitching, changing the refresh rate might fix it. A higher refresh rate, especially on bigger screens, can reduce eye strain by reducing screen flicker.
While gaming, it will greatly enhance your experience by minimizing the motion blur and input lag. This could give you a competitive edge over your gaming opponents if you’re playing online as well. If you use a digital pen and want it to feel more natural on the screen, increasing the refresh rate will make it more fluid. It will also make mouse scrolling smoother.
Apart from the benefits, changing the refresh rate can have a negative impact, too. By default, the refresh rate is often set to 60Hz because it is best for the system’s optimal performance. Increasing it to 120Hz or more can result in the screen requiring more energy, and while it might look better, a laptop’s battery life can be significantly reduced by a higher refresh rate screen.